Written by: Joel Ketonen
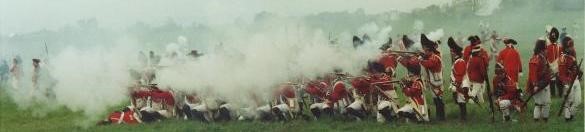
Of re-enacting : Re-enacting is generally associated with recreating the events and life style of a military period. Reenacting units exist in the US for every time period from the Greek Hoplites through Desert Storm. The most common, easiest find something on in the US are the War for the Union units, a period well past this site’s time orientation so nothing more shall be said of them. Depending upon where one lives, French & Indian, Revolutionary War, Napoleonic Wars, War of 1812, Black Hawk War (Abe Lincoln was for a time a captain in an Illinois militia company in this one), Seminole Wars, and of course the Texas War for Independence units can be found. As a rule, most re-enactment units are open to new recruits including families. With that as a background, there are a few basics involved. (1) Membership must be earned. One should never assume that just because one has a deep interest in “a unit’s period”, one will automatically be welcomed in with a hearty “Glad to see ya.” (2) Attend a few meetings & drills. (3) If there is the appearance of a mutual fit, make the necessary arrangements to go to an event or so as a recruit. Most units have members willing to loan their extra uniforms and kit enough to allow a guest to make a visually correct showing even if one is still all hay-foot straw-foot with his drill skills. Remember even in today’s military there is at least one in every company who is not a 100% with the program. Make a sincere effort and you should fit right in.
Now for the most basic caution : DO NOT BUY one blessed piece of gear, kit, uniform and especially firelock & accoutrements UNTIL you are positively sure “this unit, this period” are a good fit for you and your budget. Any unit worth getting involved with will have WRITTEN standards covering exactly what is expected of a member, particularly arms, accoutrements, uniform/dress and field kit. Units such as British ones, did I mention there are always re-enacting units representing both sides of a battlefield, whose uniforms are regimen specific for a from-to-date, can be quite expensive, often costing a good deal more than your firelock. Most units understand that and so have ways of easing a recruit into a Period / Unit Correct showing without having to first sell the first born. NOTE : As a rule, portrayed correctly, troops in the field did not always present a new, fresh from the tailors look so used and neatly repaired is often acceptable. That said, your new or used kit will mature without any additional “Hollywoodish assistance.” Just by wearing it & using it, aging enough will occur quite nicely on its own. BATTLE PARTICIPATION NOTE: No matter how well dressed, well equipped and drill proficient you eventually become, you WILL NOT be allowed to participate at an event as a drop-in individual. You must be a member of a unit pre-registered to be there. That said, if your unit isn’t going, it generally isn’t hard to participate with a unit that is if you make arrangements with them in advance.
A little cautionary note here regarding acquiring your kit : On-line and in-person at events, the people who specialize in selling things to the military re-enactors, are known to one and all as “Sutlers” will sell what sells. Many are honorable folks who, when asked, will honestly tell you if an item is appropriate for the time period you are portraying. The same holds true for individuals cleaning their closets of stuff they no longer use for whatever reason. And unfortunately there are those who wish only to move merchandise, to make a ‘Buck Eighty-Two’ as it were so once you settle on a period to portray, research, research, research and within your unit, learn who can be trusted to share the straight skinny and who enjoys leading folks down the primrose path. Remember if making your own kit and gear, it costs just as much for the raw material and takes as much time to make a Period Correct item as it does for one that isn’t. (Period Correctness Hint here : Sewing machines and Mercerized thread post-date by a goodly time the pre-1840s period. If making your own, and 100% hand stitching is not one of your skills, most units but not all will consider a “composite garment” as acceptable – un-seen seams machine stitched, seen such as button-holes hand stitched. So far as Mercerized vs. un-Mercerized thread : Mercerized cotton thread has a distinctive shine, un-Mercerized has a dull, flat look to it. As Period Correct un-Mercerized 100% cotton thread is readily available (popular with quilters), if you aren’t using linen thread, use un-Mercerized cotton for that extra touch of authenticity. And if you buy all your kit be it ready-made or tailored, the same cost-of rule applies : Incorrect costs as much as Period Correct.
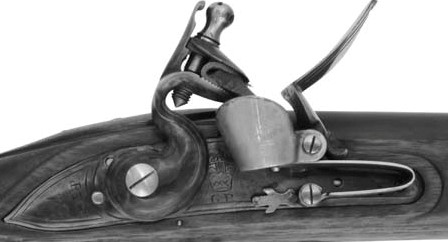
Of terminology and firelocks : No matter the military unit, for all practical purposes, you will be shouldering arms with a ‘firelock’ not a flintlock. Reason : Until caplocks became common in the mid-1820s, flintlocks from the time of their invention in 1610 were known as “firelocks” – “The ‘firelock’ is so called, from producing fire of itself, by the action of the flint” as opposed to a matchlock which requires a slow burning / glowing hemp match (think 4th July punk) to ignite the powder in the pan. While cap-locks as we know them first came around about 1818, it wasn’t until water-proof caps were developed by the mid-1820s did they gain a large acceptance in the civilian world. The world’s military took a little longer to adopt caps but that was primarily a matter of the cost of conversion. It was that widespread acceptance of cap-locks that inspired the change in terminology from firelock over to flintlock. (And in case you are wondering, the term firearms didn’t really take hold until cartridge arms appeared. There was a transitional time after the word “flintlock” came in that firelock meant all guns.)
Odds are if you join a re-enacting unit, you will be shooting a smooth-bore musket, exact model unit and time-period specific. The basic safety rules for all periods are pretty much the same :
- All arms must be well maintained and be clean when safety inspected.
- All firelocks (flintlocks) will have a flash pan guard. {Not at all Period Correct, these are a modern safety feature that every event that allows LIVE fire requires. This is to protect the eyes / face of the man to your right. When the firelock to your left goes off, you will understand and fully appreciate this requirement. As there are several different versions out there, your unit may well specify one)
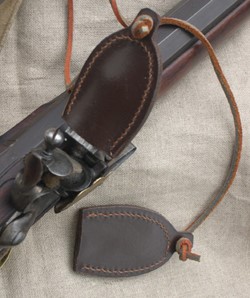
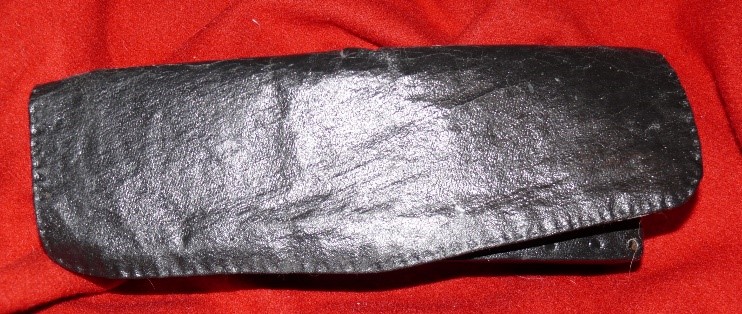
- All firelocks (flintlocks) will have a ‘hammer stall’. (A Period Correct safety device {The British were issuing them during the American Revolution}, it is essentially a leather glove that can be slid over the steel (frizzen in post-cap-lock days terminology) to prevent an accidental discharge should the cock (hammer) unintentionally let go. Inexpensive and simple, you can easily make one from scrap leather however, your unit may require a specific pattern/shape. In any case, DO NOT use artificial sinew to sew one up if in a Period Correct portrayal.
-
- Two standard pre-battle safety checks are (A) Pinging the barrel – holding the arm muzzle up, remove the rammer then when the inspector says to, ‘smartly’ send the rammer down the barrel. The rammer should bounce up while making a distinct ‘pinging’ sound. (Don’t be overly zealous – sent too smartly down, the rammer can zing all the way out) If there is a charge or old cleaning wad still down the barrel, the ramrod will neither bounce nor make that distinct ping. (B) “Put a strain on the cock’ (Revolutionary War usage for “half-cock”) then muzzle down, support your firelock by the trigger only. The hammer should remain at half-cock. If the cock falls, you will not be allowed on the field carrying that defective firelock.
- Pre-marching out to the field safety checks will be held, the exact rules can vary from event to event, the details often depending upon state law, event host’s whims such as the US Park Service or Parks Canada regulations and the event sponsor’s insurance requirements.
Of loading and firing your firelock :
SAFETY FIRST : All, repeat all period muzzleloaders and modern replicas must be loaded with the correct gun powder. DO NOT go by the color alone, go only by the labeling on the powder can. While cap locks can use Black Powder equivalents such as Pyrodex, flintlocks must be charged with genuine Black Powder. This requirement is not a matter of safety, it is simply that the sparks a flintlock creates are not hot enough to ignite any of the BP equivalents currently in production.
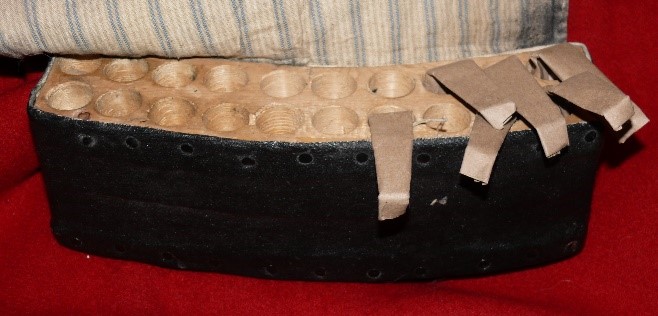
When one thinks of flintlocks, the first thought that comes to mind is “Powder Horns.” Forget about them. The vast majority of military units then DID NOT load from a horn and thus re-enactors don’t now. For safety reasons, if your unit allows or requires you to carry a horn, it will be a fashion accessory only. As part of the pre-battle safety inspection, if a horn is carried, it MUST be empty and it will be checked. If found with powder, if you are lucky, you will be allowed to dump the powder and carry on. More likely you will be banned from any further participation in the event.
How can I charge my firelock if I am not allowed to use a horn? Simple – you will use paper cartridges pre-event loaded with a specific charge of BP. The Swedes are given credit for coming up with paper cartridges back in the 1630s. They remained in use until metallic-cartridge breech loaders replaced muzzle loaders.
(1) All cartridge rolling must done at home, no making rounds in the field. {This is because you cannot control the behavior of smokers or the possibility of camp fire sparks landing in your gun powder}
(2)Under NO CIRCUMSTANCES will you bring a BALL CARTRIDGE to an event or drill. (Ball Cartridge i.e. live ammunition, a round with a lead ball / projectile or shot in it)
(3) DO NOT bring loose lead balls to an event or drill.
Paper cartridges will be carried in a cartridge box (strap over the left shoulder/ box on the right side) or in a belly box. The exact construction type, style and capacity (number of cartridges) will be unit & time period specific. Defer to your unit’s requirement for any & all such details.
To make Rolled Paper Cartridges : There are a couple of Period Correct usages that need not be followed – using rag paper to make the tubes and linen thread for tying off one end. That said, brown wrapping or grocery bag paper works just fine except there is a caution - the paper chosen must be sturdy enough to hold its shape but not so sturdy as to be difficult to tear open with your teeth. {The military did set specifications on cartridge paper.} Test by rolling a tube then holding the sample in your right hand while biting down on one end with your molars, tear. Your teeth will tell you if the paper is OK to use.
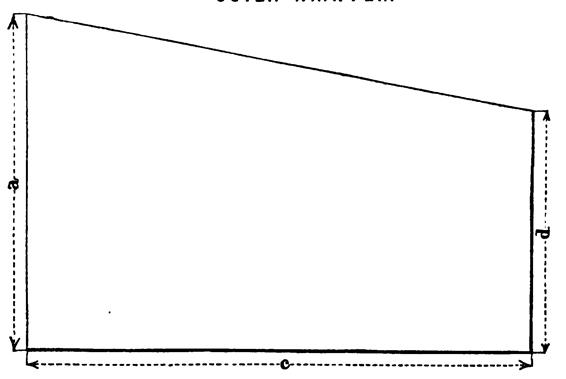
1) Cut into the paper into side c width strips
(2) With a “Square Cornered Trapezoid” pattern like the image above, mark the strips into individual sheets. {While stiff cardboard will do, a pattern from thin plywood or non-sparking aluminum plate is better. The dimensions for the US .69 caliber M1822 musket cartridge are : Side A – 3.5 inches, Side D – 2.5 inches & Side C – 5.25 inches. Your unit / musket may require a different size.}
(3) Cut the strips into individual papers.
(4) Roll the cut papers into tubes around a former. (A ‘former’ is simply a dowel rod cut to a suitable length, several inches longer than side a , one end rounded off like the top of a wood handle broom-stick. Make certain the rod’s diameter while wrapped with your cartridge paper is small enough to easily fit into your cartridge box’s holes. ) Starting with side aagainst the center-line length of your former, side c extending about a ½ inch below the former’s round end, roll so the slope spirals down towards the former’s rounded end. Twist tight that extended end then tie off with a miller’s knot (“Hold standing part of cord, twist it in a loop so the line in your right hand comes from beneath the loop. Make a second loop the same way.”) Cotton kite string works well as a tie-off cordage. NEVER, repeat NEVER close off blanks with staples.
Of filling rolled-cartridge papers : Your unit will tell you the min-max amount of black powder you are supposed to use. The reason for the uniform charge : Armies have always specified the amount of powder in a cartridge. When a re-enacting unit fires a volley, the sound of light or heavy charges will stand out. The easy way to charge multiple cartridges is after you tie-off a tube, insert it into one of the holes in your cartridge box while still wrapped around the former. Mash down then remove the former. Roll & form a number of rounds until the cartridge box is filled. Using your powder measure set at the required charge, then while the tubes are sitting open end up in your cartridge box, load your tubes. After filling those upright tubes in your box, (1) Flatten the tube tops then fold the long sides towards one another. (2) Fold the flattened end back down against the filled end. NEVER, repeat NEVER close off blanks with staples. Repeat rolling, filling and folding until have you have enough squibs (blanks) for the event. Rule-of-thumb here : Make up packets holding 10 each blanks, wrap the10-each in aluminum foil. Store the packets in a fire-proof metal box – most of the time a US Army ammo tin is acceptable. Keep your blank-cartridge packets in the fire-proof metal box until it is time to load your cartridge box for the battle. Most units keep their fire-proof metal boxes out of sight in a designated tent. Again the details may vary between units and the event’s sponsor requirements.

To load your firelock : The exact details / commands used will vary from army-to-army and from time-period to time-period so what follows is only a gross generality :
1. Hold your firelock in your left hand, lock away from your body, muzzle to your left.
2. Half-bend the cock (Go to half-cock.)
3. Open the pan (Flip the steel (frizzen) forward uncovering / exposing the pan if not already forward from having been just fired)
4. Open your cartridge box
5. Handle your cartridge (Take a cartridge out of your cartridge box by holding the blank betwixt the thumb and two forefingers)
6. Open cartridge by biting off the top of the paper so as to feel the powder in your mouth. (Biting on, tear off the top of the paper. In reality, it is NOT necessary feel the powder in your mouth.)
7. Prime by shaking some of the powder into the pan.
8. Shut the pan (close the frizzen) with a short and quick motion of your ring & little fingers.
9. Cast about your firelock. (Flip the muzzle up, rest the butt on the ground)
10. Holding the muzzle slightly away from yourself and the man to your left, pour the balance of the powder in your cartridge down the muzzle. DO NOT stuff the empty cartridge or anything else down the barrel. DO NOT withdraw or use your ramrod to tamp the powder down.
11. Discard the empty paper cartridge per the event’s standards. Some will allow you to drop it on the ground, others will require that the empty be stuffed into a pocket or pouch, generally your haversack being the most convenient one available.
That’s it, your firelock is re-enactment loaded.
Presenting (aiming) & Firing will be per your unit’s drill & command
Live Fire : Should you wish to fire live ammunition on a range or to hunt with your musket, I highly recommend using the pre-1730s loading process – paper cartridge loaded with powder only, balls carried in a separate pouch. Why the recommendation that you not make ball cartridges i.e. paper cartridges with a bullet in it : If you do re-enact, there will be no possibility of accidentally bringing live rounds to an event.
Charge your firelock the same way you do for a re-enactment. If you choose to bypass charging the pan (priming) from your paper cartridge, use a powder horn to prime the pan after charging the chamber with powder & ball.
- Load the chamber with powder from a paper cartridge
- Withdraw a ball from your bullet pouch
- Drop the ball down the barrel.
- Use a ball size small enough to free-fall down a lightly fouled barrel
- Modern muskets have barrels far more accurately bored than period pieces were. That said, it is best to mike the bore’s ID first before buying a mold to cast your own bullets. Allow for windage (Gap between the barrel’s ID & the bullet OD) when buying a mold.
- Wadding – use the empty paper cartridge. Open end of the empty cartridge down first, stuff it into the barrel (The military never patched a smooth-bore musket ball however there is no reason why you can’t patch if you want. If you do patch your ball, your rate of fire will be slower than powder/ball/wadding. Patched or wadded, the ball MUST be held firm against the powder until you light off your firelock or pull the charge.)
- Withdraw rammer, smartly tamp your load down. Return the rammer to its pipes (thimbles).
- Prime if you didn’t prime from your cartridge.
Martial arms terminology check list here :
(1) There never has been a musket rifle, no matter if flint or cap ignition..
(2) All “muskets” are smooth bores only.
(3) ‘Rifled Muskets’ (also known as ‘Altered Muskets) are arms that were originally designed and made as a smooth-bore musket then later converted into a rifle. Depending upon the nation, conversions did not start happening until the late 1840s on into the 1850s, all such work done well outside the time frame addressed by this web page.
(4) ‘Rifle Muskets’ were stout martial arms designed as and manufactured as a rifle. Typical were the US M1855, US 1861 and US M1863 rifle muskets, the numbers being the year the model was adopted.