Written descriptions of how the original muzzleloading rifles were loaded are extremely rare and lacking in details. Perhaps no one at the time saw any reason to record such mundane activity. As muzzleloading guns fell out of use in favor of breech loading cartridge rifles what was once common knowledge was simply lost to the passage of time. When the revival of interest in the old muzzleloading rifles occurred myth and folklore filled that void and much of it became accepted practice in the loading and maintenance of these firearms.
When interest in muzzleloaders began to exceed the supply of original guns and parts, manufacturers began producing “replicas” of black powder rifles to meet the demand. These manufacturers typically recommend a ball ten thousands of an inch smaller than the bore of the rifle with a patch ten thousands inch thick. For a .50 caliber rifle that would be a ball .490 in diameter and a patch .010 thick. They may also recommend a minimum and maximum amount of powder to load in the gun. These recommendations are considered a safe place to begin but they are usually not the most accurate load.
Casual shooters will typically purchase balls of the recommend size along with precut, pre lubricated patches and go shooting. If the accuracy achieved by this loading method meets your expectations you can stop reading here and save yourself much time and effort. On the other hand, you will not see shooters at organized competitions loading their rifles in this fashion.
Experienced muzzle loaders who shoot competitively and serious black powder hunters know that muzzle loading rifles are capable of outstanding accuracy and reliability when they are loaded and maintained properly. Finding the most accurate load for a muzzleloading rifle requires an understanding of all the variables involved and a systematic approach for isolating and testing each of those variables. This process is often referred to as “developing a load” or “working up a load”.
Information concerning load development for centerfire rifle ammunition is widely published and available. Any good reloading manual will outline the variables involved and a logical approach to discovering the best combination of components for accurate loads in an individual rifle. Unfortunately such information concerning black powder and muzzleloading firearms is not as widely known or circulated.
When I began my journey into muzzleloading rifles I had a solid background in the variables involved with hand loading centerfire rifle ammunition and how to isolate and test each of those variables to achieve the best accuracy in a particular rifle. When I tried to apply that method to muzzleloading rifles I had only limited success because I did not fully understand the very different set of ballistic variables involved with black powder and the muzzleloading rifle. This was decades before the internet or google existed. The very limited information I was able to find on the loading and maintenance of muzzleloaders consisted largely of folklore, myth, and no small amount of farmers’ almanac style ritual that seemed to be linked to a particular phase of the moon.
The first reliable information I discovered was in the book The Muzzle-loading Rifle - then and now by Walter Cline first published in 1942. In giving accounts of the heavy muzzleloading target rifle shooting matches he participated in he mentions some of the superstitions held by the shooters of his time. In spite of being disproved by controlled experiments using high speed photography and modern testing equipment some of those superstitions still persist to this day.
Years later I became involved with a muzzleloading gun club which holds monthly shooting matches. The members of this club are extremely knowledgeable in the loading and workings of their muzzleloading rifles. Through observation, conversation, and competition with these gentlemen, I was finally able to sort out all the different ballistic variables involved with loading these rifles and a reliable method to isolate and control each one.
My learning process occurred over a period of time, perhaps due to an atmosphere of friendly competition. When a competitor discovers a detail that gives him an advantage in competition, he isn’t likely to share that information too readily. When the final piece of the process fell into place for me I soon realized that all the top shooters in that club were practicing some elements of this method but not every one of them had a grasp of every variable in the total process. By isolating and testing each of these variables through a logical, systematic method I discovered loadings that greatly improved the accuracy of every muzzleloading firearm I have owned.
I make no claims of being the first person to discover any aspect of this method. I simply learned what the ballistic variables of muzzleloading rifles are and applied the same logical method of isolating and testing them that I used in the process of hand loading accurate ammunition for modern centerfire rifles. For some time I kept my understanding of this approach largely to myself sharing knowledge of it verbally within a circle of fellow shooters who confirmed my results are sound.
If you are interested in extending the distance from which you can effectively take game with your muzzleloading rifle or desire to place among the top shooters in muzzleloader shooting matches, continue reading as I explain each of the variables involved and how to go about testing them to find the most accurate load for your rifle. You should know that this isn’t going to be a quick process. It will require some time and effort to complete. You should also know that poorly constructed rifle barrels or those which have been damaged through improper maintenance and abuse are not capable of any acceptable level of accuracy regardless of how they are loaded. If you have doubts about the condition of your barrel have it looked over by a muzzleloader gunsmith before starting this process.
These are the internal ballistic variables which affect the accuracy of muzzleloading rifles. I have listed these in the order in which they should be tested.- Weight of the ball.
- Amount of powder by volume measurement.
- Condition of the bore
- Compressed thickness of patching material.
- Combinations of different ball size and different patching thickness.
- Amount of lubrication on the patching.
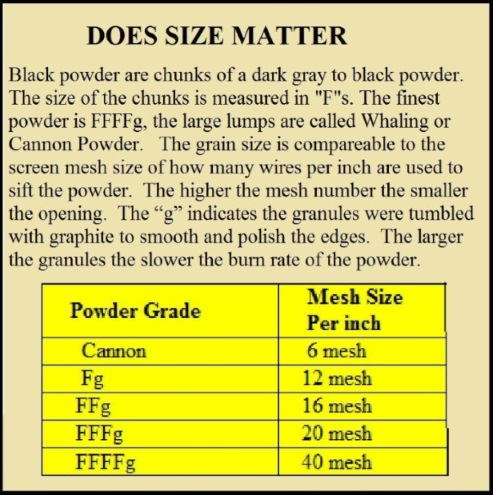
- Powder granulation.
Getting control over one of these variables alone is not going to produce your best groups. Outstanding groups are the combined results of finding the “sweet spot” for each variable that works best in your particular rifle. You can expect to see slight improvements in your rifles grouping as you advance through each step in the process. When you have worked through the complete system your rifle should be shooting impressive groups.
Before you begin testing and experimenting with the internal ballistic variables there are some human inconsistencies and errors which must be addressed to get reliable results from your efforts.
Variables in the human factor:- Flinching
- Ability to load consistently
- Ability to aim consistently.
Be as consistent as possible in how you load the rifle. Measure your powder charge by slightly overfilling the measure and scrape off the excess with the back of your knife or other straight edge. Do not tap or shake the measure. That will cause the powder to settle and inconstancy in the amount of powder the measure will hold.
When seating the ball down onto the powder charge use the same amount of pressure on the ramrod each and every time. You want to seat the ball firmly, without crushing the powder kernels. Consistent pressure on the powder produces a more consistent burn rate and better consistency in your velocities from shot to shot. It’s best to use a metal, range type ramrod of brass or steel with a muzzle guide when loading for bench shooting. Do not bounce the ram rod or hammer on it to seat the ball. Doing so deforms the ball and out of round balls may not fly true.
Use the smallest targets you can see well. Set your targets from 25 to 50 yards depending on the size of your target and how precisely you can aim. Don’t be concerned about sighting the rifle to hit center of the bull’s eye. All you need at this time is to keep the groups on the paper. You will fine tune your sights after you have found the most accurate load. If possible, consider temporarily mounting a good peep sight or scope on the rifle for shooting these test targets. The better you can see your target and sight alignment the better your results will be. If you are not able to mount either sight system on your rifle remember to keep your vision focused primarily on the front sight.
After you have discovered the best load for your rifle, I recommend adjusting the sights to put the center of your groups on the bull’s eye by shooting from the bench rest. Some shooters will argue that it’s best to sight in by shooting from off-hand positions. I disagree, I believe doing that hides the human error in shooting off-hand. By sighting from the bench, any error in your stance, posture, or how you hold the rifle will show on your target allowing you to make corrections and perfect your off-hand shooting. Remember, any deviation of angle in your shooting is multiplied by the distance to the target. A small miss at close range becomes a huge miss at longer range. Perfecting your off-hand shooting skills greatly increases your effective range in the field.
Internal condition of the bore.
It is very important that you wipe the bore of the barrel between shots with a dry or slightly damp cleaning patch during all this test shooting. The reason is to keep the bore in the same condition for each and every shot. If you neglect to do this fouling builds up with each consecutive shot. As the amount of fouling increases the friction increases, internal pressures go up, the velocities go up, and each shot strikes higher on the target than the last. A vertical string upwards will show on the target.
You don’t want to actually clean the barrel between shots, just wipe away the excess fouling in order to maintain the same amount in the bore for every shot. I prefer to run a dry cleaning patch down the barrel and back out only once after each shot. If your cleaning patches are too tight to pull back out of the barrel dry, you can moisten them slightly. But it is difficult to apply a consistent amount of liquid to each patch so the better method is to turn down the size of the cleaning jag to make it smaller. The easiest way to do that is to chuck your cleaning jag in an electric drill and file it smaller as you rotate it. I prefer to get my cleaning patches from the same source to insure constant size and thickness. This insures I am leaving the same amount of powder residue inside the bore for every shot. You can purchase cleaning patches or make your own from cotton flannel fabric and cut it to size with a rotary cutter.
Sort the balls by weight.
The first variable we need to get control of is the weight of the round balls. Use a reloading scale and weigh each ball from a box of 100. You will find that some are much lighter than the heaviest. If the balls are all the same size, this should tell you that there is an air bubble in those lighter balls. Unless that void happens to be in the exact center of the ball it will be out of balance. Those out of balance balls are going to wobble in flight to the target. The lightest balls of course have the largest air voids. Those out of balance balls will strike outside the group producing a flier on your target. If you don’t eliminate the fliers by sorting them out with the scales, any further load testing is going to be in vain. Check the size of the lightest and the heaviest ball with your dial micrometer. If these measure the same diameter you have again confirmed the presence of a void in that lighter ball.
When sorting balls by weight I like to separate them into groups that weigh exactly the same to within one tenth of a grain. I use the heaviest groups of balls for load development and serious competition on paper targets. The mid weight groups are fine for hunting or shooting metallic gongs in competition. The very light balls either go back into the casting pot or get used for plinking.
If target shooting for score on paper targets does not interest you, latter on you can save some time and effort by sorting the balls into two groups. Do that by setting your scales to one and a half grains lighter than the heaviest ball. Then as you weigh each ball, put those which weigh heavier than that setting into one group and those which weigh less into another group. This is a quicker way to separate the air bubble, lightweight out of balance balls from the heavier balls which are more stable and fly true.
You won’t notice much difference in your group size when shooting offhand or hunting with balls that weigh within one and a half grains of the heaviest one. Those balls in the lightweight group can still be used for informal plinking. Regardless of which method you finally decide upon, your bench rest shooting and load development work should be done with balls that weigh within one tenth of a grain from each other. You want to know that any deviation in the size of the group on your test target is the result of the variable you are testing and not caused by a ball that was a half grain lighter or heavier than the others.
Most shooters agree that hand cast balls are more consistent in size and weight than swaged balls. If you are using cast balls be sure to position the sprue up and centered when you seat it into the muzzle. If you load the ball with the sprue to one side it will wobble and fly outside of the group. Swaged balls lack a sprue so this won’t be a concern. If you elect to use swaged balls purchase them from a dependable source so you will always have a reliable supply.
Choose the proper granulation of powder
Current wisdom suggests that 3-F granulation black powder is best in rifles of 45 caliber and smaller and 2-F granulation is better for 50 caliber rifles and larger. This is not a hard and fast rule and many 50 caliber rifles will shoot best with 3-F granulation powder. You will test that latter. For your initial testing start with those recommendations. Measure your powder using an adjustable powder measure. Do not weigh out the powder charges on a scale. Black powder measures more consistently by volume.
Set your adjustable measure for an amount in grains equal to the caliber of your rifle. For our 50 caliber rifle that translates to 50 grains of black powder. Slightly overfill the measure and scrape away the excess level with the top. I prefer the type of measure with an attached spout for target shooting. The spout levels off the powder charge when it is turned back into place after filling the measure. Do not tap or shake the measure. Doing so causes the powder to settle and compact making it near impossible to achieve consistency with the amount of powder in the measure.
Good patching material is one hundred percent natural fibers. Synthetic fibers will melt when you fire the gun and leave a mess in the bore. Neither is conducive to accuracy. You want cotton, or linen fabric with a tight weave. Pillow ticking is a good choice to begin with. Go to your local fabric store and buy about a eighth or a quarter yard. Run it through the washing machine first to remove any starch or sizing. Cut your material into strips just a little wider than the rifle muzzle. Use spit, or black powder cleaning solution (moose milk) for lubrication. Use just enough to dampen the patch.
Now you are ready to take the heaviest balls you have weighed and your pillow ticking strips to the range and start testing powder charges by shooting off of the bench rest. Wear eye and hearing protection! Use sandbags and a good steady front and rear rest. You want to eliminate any stray shots that might be caused by human error. Set your target at 25 yards and fire a shot or two to see if you are hitting on paper. If not, post a larger target or move the target closer until you are hitting the paper. If needed move the sights until your shots are on the target. It isn’t necessary to sight in on the bull’s eye at this point, you just need to get the groups somewhere on the target.
Finding the best powder charge
With everything set up and after confirming that your shots are hitting on the target you are ready to begin testing. Post a new target. Wipe the bore after each shot to remove excess fouling. Set your powder measure at 50 grains. Fill the measure, level it off and pour it down the barrel. Moisten your patching strip with saliva by placing it in your mouth or spray a little of your cleaning solution or moose milk on it. I always run out of spit so I prefer to spray it with moose milk. Lay the patching across the muzzle, place a ball on it sprue up and centered if it has one, put the short end of your starter on the ball and give it a whack with the palm of your hand. Cut off the patching with your knife or scissors. Seat the ball further down the barrel with the long end of the starter then seat it onto the powder charge with your ram rod. Shoot the target. Repeat the wiping, loading, and shooting until you have five shots on the target. Retrieve that target and write on it the powder brand, granulation size, and amount in grains. Record the ball size and weight along with the patching material and lubricant used.
Post a new target and increase the powder charge by five grains. (Two grains for pistols and small caliber rifles) Do not change any other component of the load. Continue shooting five shot groups on the targets, increasing the powder charge by five grains for each target until you reach the maximum charge recommend by your rifles manufacturer. For safety and to avoid damaging your rifle do not exceed the maximum load recommended by the manufacturers of your rifle. Be sure to record all information on each target.
When you have finished shooting you will have ten to twelve targets with five shot groups on them. You will notice a pattern developing in the size and shape of the groups. Normally each group will become tighter and smaller as you increased the powder charge. At a certain point the groups will began to open up again and grow larger. Select the target with the best group. There, written on that target, is the most accurate powder charge for that rifle.
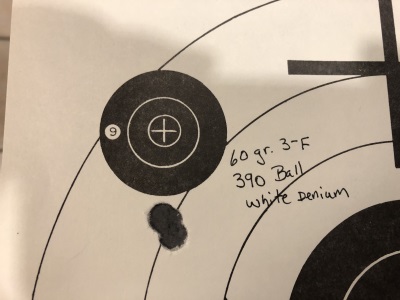
This is the first 5 shot target from my 54 caliber percussion rifle at the beginning of the load development process. It was shot with weight sorted balls, pillow ticking patching and Moose Milk lube
.
Here is the final 5 shot target after compleating this process.
Patching material
Now go down range and pick up as many of your fired patches as you can find. When you study these fired patches you will notice several things. They should all be perfectly round and they will have a black ring in the center. If the patches are torn, cut, or shredded, or you see that the powder burned through the fabric your patching material is too thin. Another sign of thin patching is burning inside the black ring on the side of the patch that was in contact with the ball. That is a result of the ball slipping out of the patching under the pressures of the burning gases and you need thicker patching material. If you find cuts in the patching material where the patch is compressed between the ball and the lands in the bore, it is usually a sign of sharp edges that remain on the lands from the rifling process. This occurs more often in production built rifles. Custom made barrels are finished much smoother and usually hand lapped before leaving the shop. In any event, those sharp edges will usually smooth out on their own after a hundred or so shots have been fired.
If your bore is particularly rough it may need to be polished smooth by hand lapping. You can accomplish this by using JB bore paste on a tight cleaning patch. Use your metal range rod with a bore guide / muzzle protector and polish the bore according to the instructions that come with the JB bore paste. Extremely rough or neglected barrels may need to be polished out with valve grinding compound. However, this is a drastic measure that may salvage a badly neglected barrel but should only be done as a last resort. In this case one is better off to replace it with a new barrel.
Selecting the best patch thickness
Now that you have found your best powder charge you are ready to test different patching materials. You will need a micrometer for this. Use the micrometer ratcheting handle and measure the thickness of the material you used for patching. Practice taking measurements on different places on your strip of material until you are getting consistent measurements. Let us assume that you are getting measurements that show your fabric to be .015 in thickness. That would be the thickness of the fabric before it is compressed between the ball and the lands in the bore of your barrel. Fabric using a tighter weave or heavier threads will compress less than fabric with lighter thread or looser weave.
Measure your patching strip again but this time instead of using the ratcheting handle of the micrometer which is designed to slip at a certain pressure, grasp the handle with your thumb and forefinger at a point other than the ratcheting part of the handle and apply as much pressure on the fabric as you can using only your thumb and forefinger. You will notice that the fabric compress to a much thinner measurement now. This is what we call the compressed thickness of the material. And this measurement is the one which is critical to the accuracy of a muzzleloading rifle.
If, as we assumed earlier, your fabric measured .015 in its uncompressed measurement you likely found that it compress to a measurement of .008 or perhaps even thinner. If you were to measure a different fabric you could very well find that it also measures .015 thick uncompressed but that its compressed measurement is .010. Why is the compressed thickness of this fabric different than that of the other fabric? Because the fabrics consist of thread that varies in size, has a tighter weave or perhaps both conditions exist.
This compressed measurement is critical to accuracy in muzzleloading rifles. A thousandth of an inch in patch material thickness can be the difference between a load that shoots very tight groups and one that looks more like a shotgun pattern. Several factors determine the best thickness of material needed for your rifle to shoot its best groups. One of these is the depth, width, and shape of the groves in your barrel. A barrel with seven grooves in its bore will have narrower grooves and lands than a barrel with six groves provided the bore is the same caliber. The bottom of the groves might be square or rounded. The depth of the groves will vary. Some rifle barrels have shallow grooves while others will have much deeper groves. Also consider that barrel groves made on the same machines will vary slightly in the depth of the groves as the tooling wears down. No wonder then that an accurate load for one rifle barrel may not shoot well in another apparently identical barrel. And we haven’t yet considered the different rates of twist used by different barrel makers.
Rate of twist in the rifling is expressed in the number of inches a ball must move through the barrel in order to complete one full revolution. A barrel made with a 1-60 twist rate means that the ball will need to pass through 60 inches of that barrel in order to complete one full rotation. A barrel with a 1-20 twist rate means that the ball will complete one full rotation within 20 inches of that barrel. The best twist rate will depend on the size, shape, and weight of the projectile as well as its velocity.
Fortunately for us shooters the barrel makers have done the math to determine the best twists. Unfortunately, we don’t have much choice in the matter. Production rifles may allow shooters to choose between twist rates which are best suited for round balls or one that will better stabilize bullet shaped projectiles. Custom barrel makers usually provide a few more options. The best we can do as shooters is to consider whether we intend to use our rifle for hunting and the higher velocity loads necessary for that or for match target shooting with slower, lighter loads and order the appropriate twist in a custom barrel. Otherwise we are going to have to use the compromise twist in most production rifles.
The patch material has two important functions. One is to grip the ball tight enough to impart spin to it. This gyroscopic spin is what stabilizes the ball in flight and why a rifle is so much more accurate than a smoothbore gun. The other important function is to act as a seal for the expanding gasses that send the ball on its way to the target. If the patching material is too thin or too light the ball will jump clear of the patch before it exits the muzzle or the hot gasses will burn through the patch, past the ball, and push it off course as it exits the muzzle. Because of all the variables in size, shape, and depth of rifling grooves previously mentioned it is impossible to predict the thickness of patching material necessary for the most accurate load in any rifle. Ideally we want a patching material thick enough to fill the depth of the groves in our barrel and grip the ball firmly in the patch to keep it there snugly until it exits the muzzle. We also need that material thick enough to withstand the heat of those burning gases without burning through and allowing a gas leak to blow past the ball.
Fortunately, you now have a method to accurately measure the compressed thickness of fabrics and I am going to explain a systematic method to allow you to find the best patching material for your particular rifle. Take your micrometer to the fabric store and look for materials that when compressed, measure a thousandth inch thicker than what you were shooting. Ticking, muslin, denim, or linen are all good as long as these are one hundred percent natural material. Read the label on the bolt, a lot of denim and lately even some ticking contains polyester. You do not want that. Choose fabrics of several different thicknesses up to about .022 (sometimes even thicker material is required for rifles with deep grooves) Try to find materials in increments of one thousandth of an inch apart and purchase the smallest amount the store will allow. Typically, an eighth of a yard. I like to mark the label on the bolt of the fabric with my initials to help identify it when I go back to purchase more. At least save your receipt so you can get the same fabric that shot best from your rifle when your return to buy more.
Cut some strips out of each sample of fabric and mark them on the end with the measurements. Then go back to the range and shoot some more five shot targets with each thickness. Use the best powder charge from your previous range session, the balls you sorted by weight, and the same lube. The only thing you want to change about your load is the patching. Start with the fabric you used previously then go to the next thickest and so on. Be sure to write on the targets which sample was used along with all the other information you have recorded on the previous targets.
You will notice the groups getting smaller and tighter as the thickness of the fabric increases. Continue to use thicker material until the load becomes so tight that you must use a mallet to start it down the barrel. When the load becomes that tight and you have to pound the ball out of shape to seat it your groups will begin to open up again. Now compare all your targets and the one with the best group will show you which material thickness is right for your rifle and that particular size ball.
Selecting the most accurate size ball
It is a good idea to repeat this test using different size balls. In our example of a 50 caliber rifle, balls are available in sizes .480, .490, and .495. You may find that your rifle is most accurate with a combination of a smaller ball with a thicker patch or a larger ball with a thinner patch. Be sure to sort all those balls by weight. You don’t want to miss identify a fantastic load because of a light weight ball. When you have completed this stage of your testing you will have the information necessary to select the most accurate powder charge, ball size, and patch thickness for your rifle.
Time to think and make some choices
At this point you have some decisions to make. If your goal is strictly match target shooting you can select a tight loading combination of patch thickness and ball size. Even if you must use a mallet to start that load into the muzzle. If that tight fitting load happens to be the one that puts all five shots into one hole not much larger that a single ball, use the mallet!
Now if target shooting is going to be your main thing go back and test your powder charges again, this time starting with 50 grains and going down by five grain increments. It doesn’t take a powerful load to punch a hole in a paper target and many rifles will shoot outstanding groups with very light loads. One of my 50 caliber rifles shoots its smallest groups with 30 grains of 3-F Goex powder.
However, if you intend hunt or shoot trail walk type of events that require loading from a shooting pouch you may need to accept some amount of compromise between accuracy, ease of loading, and adequate power / velocity necessary to make a humane kill of your game. Personally, I am willing to give up some amount of accuracy in favor of a more powerful load needed for hunting and one I can load without needing a mallet to start the ball. This doesn’t necessarily mean you need the heaviest powder charge your gun can handle to kill game. One of my 50 caliber rifles puts the ball completely through whitetail deer with a load of only 60 grains. In making this decision you now have reliable information recorded on all those targets to guide you. Choose your best load according to these considerations and the groups on the targets then go purchase enough of that fabric necessary to last a good long while.
Finding the correct amount of “slickness” for your patch lube
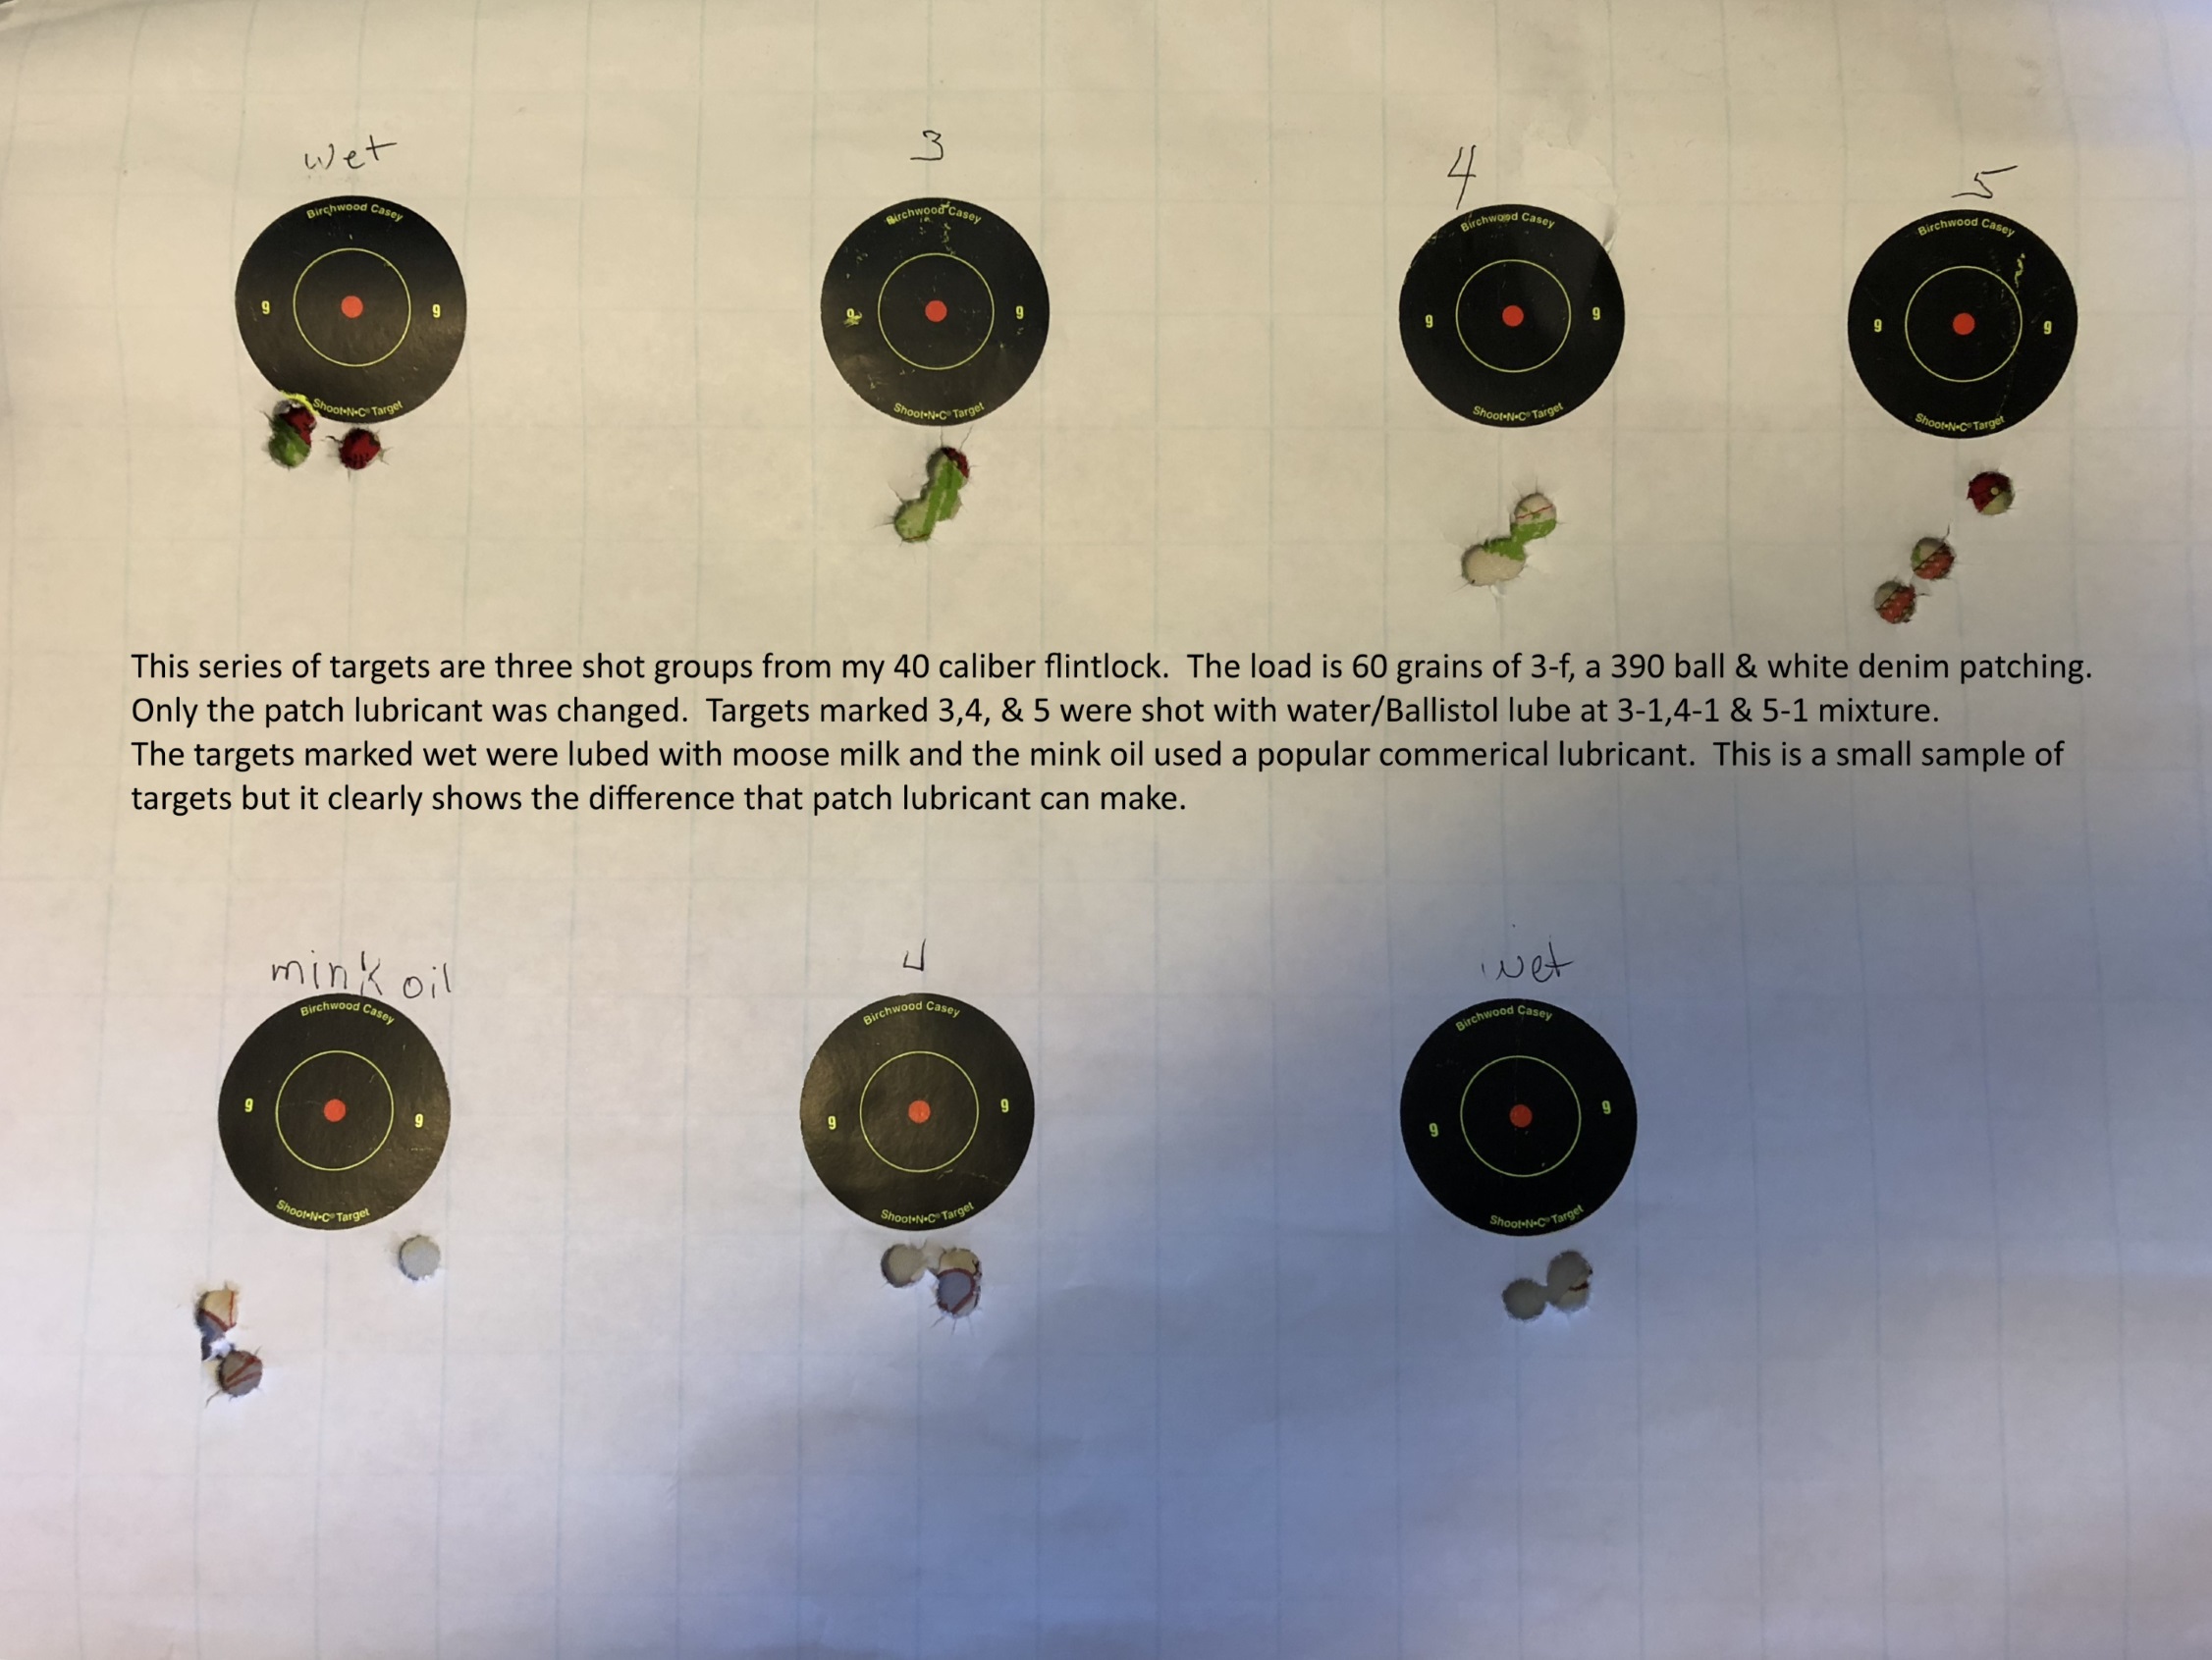
The final variable that affects the accuracy of your load and the size of your group is the patch lubricant. A patch that is slicker than others because it has more lubricant on it is not going to have the same amount of friction going out of the barrel. Less friction equals less pressure which will equal a lower velocity. That ball with lower velocity will not strike the target in the same place as the others. Getting a consistent amount of lubricant on every patch equals consistent velocities for every shot.
You can control the amount of lubrication on and in the patch material by using a water-soluble oil. Yes, you read that correctly. An oil that dissolves and mixes thoroughly with water. The cooling fluids used by machinists to keep the cutting head of their machines from overheating is one of these types of oil. ‘Ballistol’ is an easy to obtain oil of this type and is available in smaller quantities. This is also one of the ingredients in moose milk recipes so you will need to have some on hand. Most good gun stores will have it, if not it can be ordered over the internet.
Mix this oil with water and soak your strips of patching in it until they are fully saturated. Then lay those strips out flat on a non-porous surface to dry. The water will evaporate out of the fabric leaving only the oil. Always lay the fabric strips out flat. If you hang them to dry the water/oil solution will run down the strip leaving more oil at the bottom and less at the top.
You want the same amount of oil equally distributed through the entire strip of patching material. Once dry, roll your strips of patching up and store them in a plastic baggie or air tight container such as an empty pill bottle or Tupperware container. With this method you insure that every patch you load will have the exact same amount of lubricant, thus eliminating one more variable that affects the accuracy of your load.
To use this method to control the exact amount of oil that is distributed in the patching material you will test different ratios of water to oil. Start by putting one measure of oil in a glass jar. I use a one ounce measuring cup similar to those used to measure a dose of liquid medicine. Then add five measures of water and mix well. Soak one strip of your best thickness of patching material in this mixture, squeeze the excess out of the fabric back into the jar. Lay that strip out flat to dry and mark it 5-1. Then add another measure of water to the mix and soak another strip. Lay it out to dry and mark it 6-1. Continue to add one measure of water and soak one strip for a 7-1 mix and so forth until you reach a solution of 9-1.
Go back to the range and load your best powder charge and ball combination with the 5-1 mix lubricated strip and fire a five shot target. Do not add any additional lubricant to these patch strips. Record all the data on the target and repeat with a new target changing only the patching in your load to the strip marked 6-1. Do this until you have shot a five shot target with each strip of patching or until it becomes too difficult to seat the ball due to the patch strip being too dry. You will again notice that the groups on the targets show a pattern of becoming smaller and rounder until the load becomes so tight that pounding the ball out of round causes the group to open up or the load is so tight you can’t get it started in the muzzle.
The reason this works is because the oil mixes evenly with the water and the fabric will only absorb so much of this mixture until it is fully saturated. Once it reaches total saturation the material will take no more. Allowing the fabric to air dry lets the water evaporate away leaving only the oil in the material. Mixing more water into the oil causes the fabric to absorb more water and less oil so less oil remains in the material after the water has evaporated. In this manner we are able to control precisely the amount of oil applied to our patching. Now study your test targets again and there on the target with the smallest group will be written the best mixture of water to oil for your patching in that particular rifle.
This water-soluble oil method is absolutely the best, most consistently accurate patch lube method in use today. Unlike grease or straight oils, you can precisely control how much lubricant is applied to every patch. Unlike spit or wet lube mixtures this will not freeze in cold weather. It will not dry out if the load sits in the barrel during a long hunt or while waiting to take your shot on the range. It won’t soak into your powder charge. It will not leave a built up layer of crud in your bore like some of the concoctions of lip balm, waxes and grease. It will not cause a ring of rust inside your barrel if it is left in the bore over a period of time. Unlike Crisco, lard, or olive oil, you don’t want to use it to cook your breakfast. But you can control precisely the amount of lubrication on your patching in order to discover exactly how much “slickness” your barrel requires to shoot its best groups.
Typically, most shooters who use this method will find their best groups to be with a 7-1 or 8-1 mix of water to oil. When I lived in a more humid area of the country that was the best mix for my guns. But after I moved to the High Desert of New Mexico with its drier humidity, I found that I had to change my lube mix to a 3-1 mixture. The 8-1 mix that shot so well before was now so dry that I could not get that load down the barrel without pounding the heck out of the ball. This is because the amount of water that will evaporate from the patching material cannot exceed the amount of moisture in the air. In a dryer climate more water can evaporate from the patching. So consider that your results may vary according to your local conditions of humidity and adjust the mixture accordingly. Nonetheless, this method will reveal the correct amount of lubricant for your conditions and the most accurate loading for your rifle.
Summary
If you have followed these procedures in the order in which I have listed and explained them your rifle is now shooting some very nice groups. This would be the time to re-test and fine tune your powder charge. Now that you have discovered the ideal combination of ball size, patching thickness, and lubrication your rifle may show a preference for a slightly increased or decreased amount of powder which might not have been as obvious before. Sometimes a change of one or two grains will make a discernible difference. You should also test the other powder granulation. Some rifles will show a preference for 2-F while others shoot better with 3-F, If you don’t test, you won’t know.
This system of load development works as well in pistols as it does with rifles. Some smoothbore guns have also shown improvements using this method.
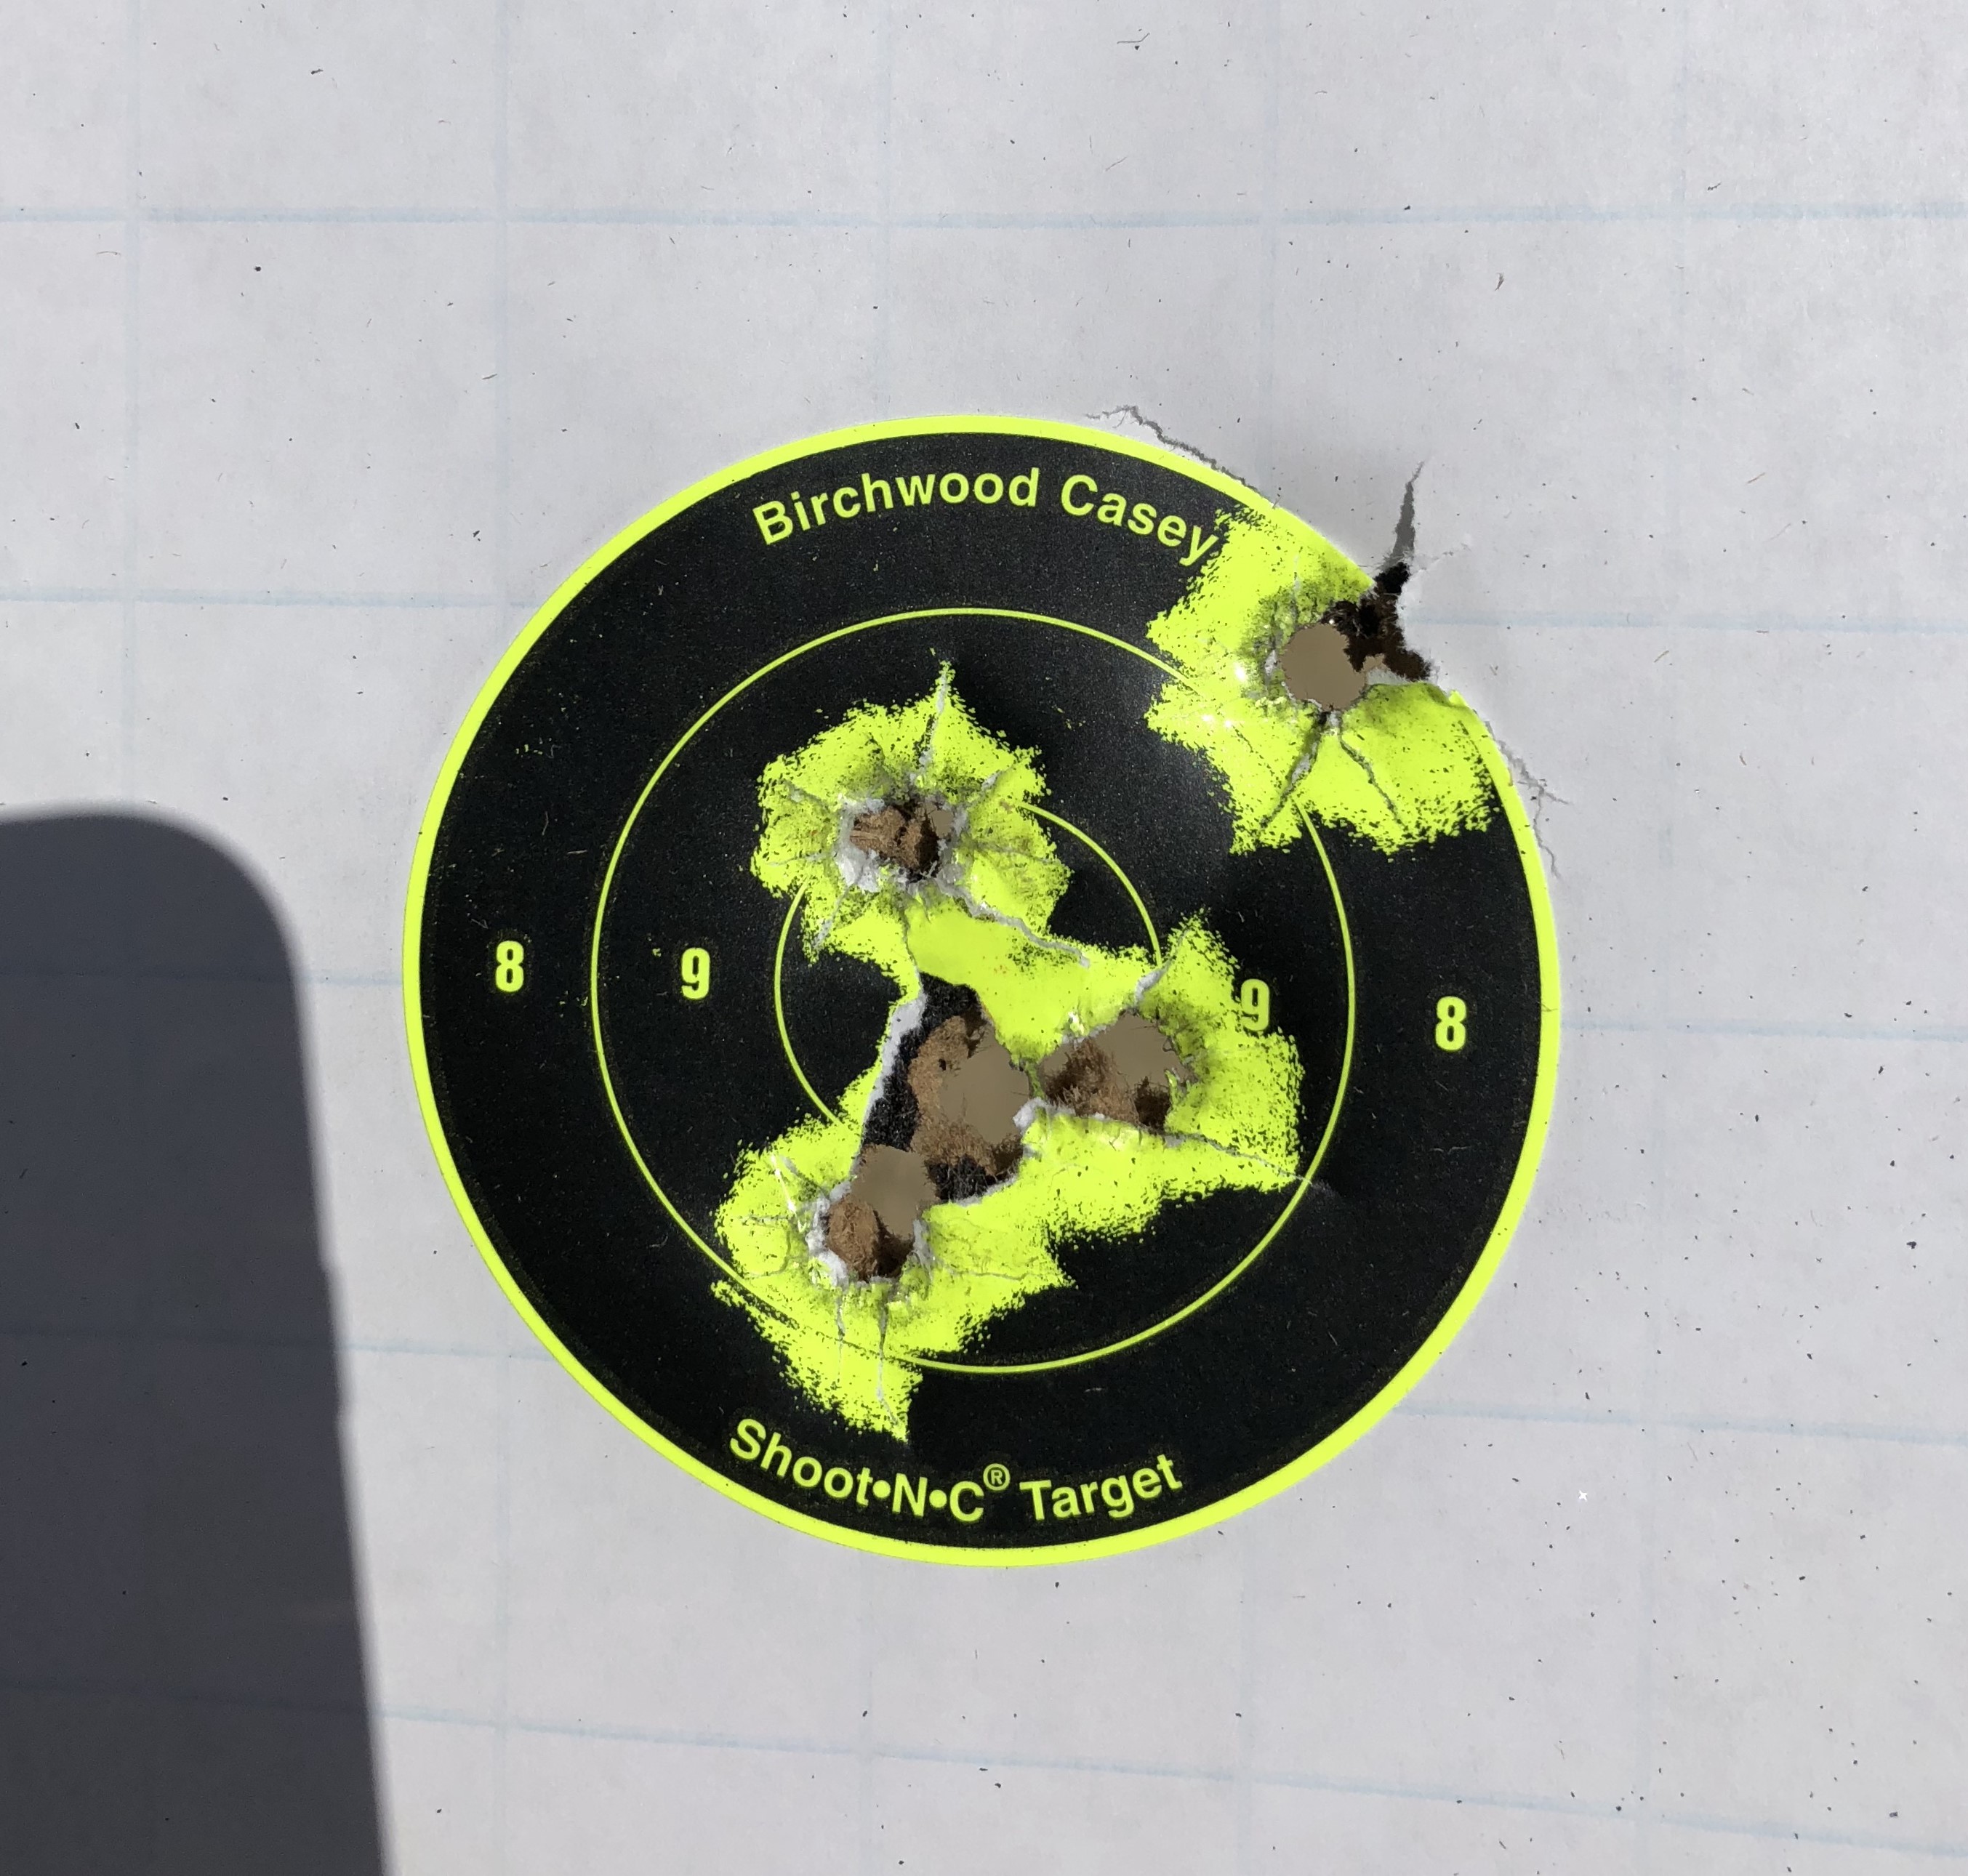
This target was shot off-hand with my 45 caliber percussion dueling pistol to win the pistol match at a rendezvous. There are six shots in the group.

These two targets were shot to confirm my results after I finished this load development system with my 40 caliber flintlock. At this point I am ready to adjust my sights to move those groups into the X ring.
Oops
If your rifle isn’t shooting good groups yet you may have tried to shortcut the process somewhere or did not fully understand it and managed to overlook the “sweet spot” with one or more of the variables you were testing. I hope not. But if this is the case you need to reread all the information I have given you, start over, and follow the system in its entirety.
For this process to produce results it is imperative that you change only one variable at a time during your testing. You must also follow the order I have given you for testing these variables. Attempting to test for patching thickness before you find the sweet spot in your powder charge is not going to show reliable results on your targets. Therefore, you made a decision based on faulty information.
Review your bench rest shooting technique. Are you being consistent in all aspects of shooting from a bench? Are you resting the barrel in contact with your front rest for some shots and then on the wood of the fore stock for other shots? If you are not confident in your bench shooting technique go and watch some bench rest shooters in action. If you don’t understand the “why” of what you see them doing wait until a break in the shooting and ask questions.
Re-check your loading procedures. Are you using consistent pressure when seating the ball with your ram rod? Are you pounding it down the barrel? Are you wiping the bore between shots? All these details have an effect on where the ball strikes the target. Consistency in every action is critical. Occasionally, even the most experienced bench shooter will pull a shot off of his aiming point. When that happens you are usually aware of it. But don’t count that shot in the group on that test target. Simply put another shot on target or post a fresh target and shoot those five shots over again.
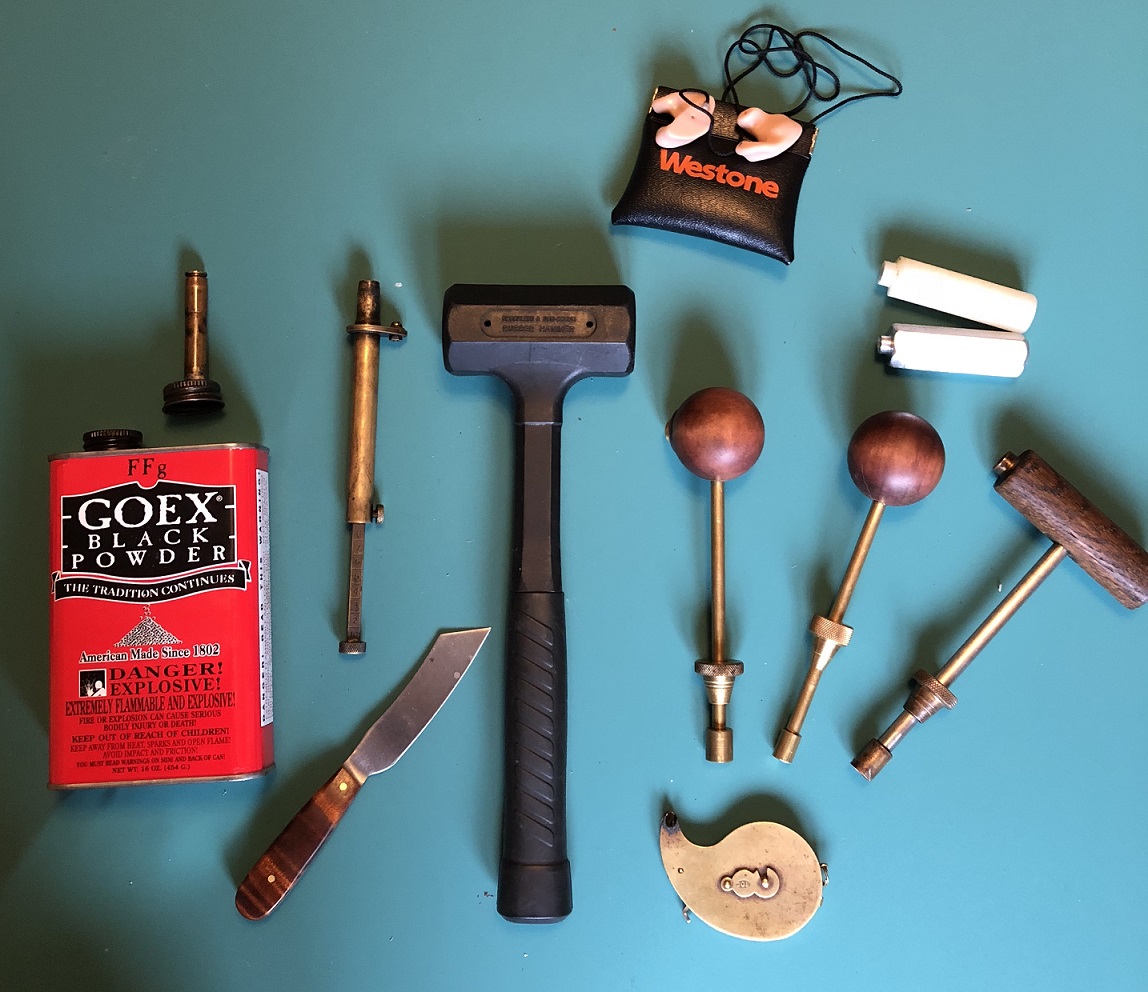
These are the specality tools and items I like to use when loading and shooting from the bench and during formal competitions. Some are safety related, some are more precise, and others are for convience.

One piece steel range rod with muzzle guide and patch jag.
avaliable from Track of the Wolf
From left to right;
Powder can and home made capped spout. (made from 2 brass cartridge cases)
Adjustible powder measure with leveling spout. Patch knife.
Dead blow mallet to start tight loads. (saves hands from brusies)
Custom fit hearing protectors.
Two custom made short starters for use with mallet. (caliber specific and made to seat the ball at the correct depth for ideal patch size when cut off flush with the muzzle.)
Three different caliber starters with muzzle guides. (custom built)
High capiticty capper. (from Ted Cash)
Happy shooter at the Texas State Muzzle Loaders State Competition.

Some random thoughts on black powder.
You may have noticed that I have not mentioned use of modern substitutes for black powder. This is because nothing currently available will work in a flintlock rifle. A flintlock simply cannot generate enough heat to reliably ignite substitute powders. My early attempts to use Pyrodex in my traditional side lock percussion rifle was a dismal failure both in accuracy and dependable ignition. I know of absolutely no competitive shooter using substitute powders in traditional muzzleloading rifles. Whether any of this method applies to substitute powders I haven’t a clue. I have no experience in the use of modern shotgun primer, in-line style of rifles and hold no desire or interest in them.
I am aware that recent ill-conceived government regulations have brought an end to the days when one could walk into any sporting goods store and purchase a pound of black powder for as little as $4.00. Accessibility to real black powder is a complaint I hear all too often and may be the reason I get so many questions about artificial powders.
If one is serious about accuracy and dependability in traditional style muzzleloading rifles real black powder is the only way to go. You may as well accept that you are going to have to contact one of the suppliers of black powder, fill out the required paperwork, and pay the hazardous materials shipping fees to get it shipped to your residence. The only other option is to gather some friends who shoot muzzleloaders and make a road trip to one of these distributors to avoid paying the additional fees for shipping.
Currently we have several different brands of black powder to choose from. I am frequently asked which is best. I know only that the main difference between them, other than price, is what type of wood was used to produce the charcoal in that particular brand of powder. I know some good shooters who swear by one brand while swearing at another. My observation and only my observation, is that most matches I attend shooters are using Goex or Swiss powders. I am not aware of any scientific testing to prove one powder superior over another. All I see and hear is subjective opinions concerning how clean or dirty a particular brand burns or opinions of how consistent the velocities of one brand of powder is over another. For every negative opinion on a particular brand I hear an equal number of positive opinions. Until some testing is performed I can only suggest that you get a good ballistic chronograph and try to sort it out to your own satisfaction.
Two factors which I am certain affect the consistency in burn and velocities in black powder are humidity and powder settling in the container. If one is shooting on a very humid day your powder is going to absorb moisture from the air. This leads to increased fouling in your barrel that must be dealt with. It also affects the burn rate and subsequently the velocity of your charges and this will change the point of impact on your target as well as having an effect on the size of your group. I know of shooters who, once they open a can of powder to shoot a match, will not use the remaining powder in that container to shoot another match the next day or at times even latter on the same day. They will load from a new container which has not yet been exposed to the humid air.
One of my black powder mentors, an engineer by trade and a long time competitor in unlimited weight class, long distance bench rest matches purchases his powder in large quantities and sifts it through three sieves of precisely measured mesh screening. By doing this he segregates all the kernels of powder into batches which match precisely in size. His method of screening is more precise than the methods used by the makers of black powder and he claims better consistency in burn rate and velocity by doing this. I am certain of the difference this makes in the groups fired from his extremely heavy bench rifle. However, I would never see this difference in my shooting of targets off hand with traditional weight rifles. I simply cannot hold the rifle steady enough for that level of consistency to be noticeable on my targets. Consequently doing that for my application would be wasted time and effort.
What I have observed is the change in velocities that occur due to the settling of smaller kernels and particles of powder to the bottom of the container. This is really magnified when traveling a long distance to a shooting match and the powder is transported in your vehicle. The vibrations of the vehicle cause this separation to happen at an accelerated pace. That can of powder now consist of the largest kernels sitting at the top of the can, the finest dust at the bottom of the can and layers in between which would screen to be sizes from 4-F to as large as 2-F. If you think that won’t play the devil with velocities try shooting it over your ballistic chronograph. In an attempt to negate this effect, I lay my powder cans on their sides in the vehicle.
The most humorous example of this sifting effect I have witnessed was when a friend who shoots with me in rendezvous matches was trying to diagnose the reason his rifle was printing groups higher and higher on successive targets over a three day shoot. He was sure something had gone wrong with the bedding of his barrel. As it turned out, this fellow never emptied his powder horn. Over the course of several years he just topped it off after every event. This particular event consisted of many more targets than he usually shot and he was loading powder from near the bottom of his horn. This powder was about as fine as 4-F granulation and dust. The load he had his rifle sighted in for was with 2-F granulation. After that discovery, he always emptied his horn back into a powder can following every event.
Keeping written notes and information concerning your testing and load development is a time and components saver. It also helps you to notice trends when developing loads for several different guns. Earlier, when we talked about measuring powder charges I stated that volume measurements produce more consistent results than weighing black powder on scales. Now that you know the amount of powder your rifle shoots best, go ahead and fill your measure with that amount and then weigh it on your scales. Record that weight somewhere you won’t forget. If you should ever lose that particular powder measure, or wish to make another, you will be able to duplicate it by weighing out that same amount of powder without having to do all that powder charge testing again. It’s rare to find two powder measures that are calibrated exactly the same. Typically a measure marked for 50 grains doesn’t actually hold 50 grains of powder by weight. It will also hold slightly more 3-F powder than 2-F. After going to all that trouble to find your ideal powder charge don’t lose it because powder measures are made inconsistently.
I haven’t mentioned percussion caps as a variable in muzzleloader accuracy only because I have not noticed a reason to conduct testing on them. I typically purchase percussion caps by lots of one thousand. Usually I use CCI or RWS caps. If there is any effect on consistency of groups or point of impact between the two I have not been able to measure it.
I have been asked about the difference in accuracy between cast balls and swaged balls. The truth is, shooters win matches with both. If one person cast his own balls using good casting technique and the same mold, his cast balls will be more consistent in size and weight than any swaged balls you can purchase. The only downside with cast balls is that you have the sprue to contend with.
Shooters who do not want to get into casting round balls for various reasons will find greater variation in the size and weight of the swaged balls they purchase. This variation might be caused by the amount of antimony in different batches of lead or because the machines in the production line are not all calibrated exactly alike. Regardless, sorting those balls by weight will remove any disadvantage when competing. When I shot swaged balls in competition I ordered them in lots of 500. By the time I had them all sorted by weight I was left with larger numbers of balls which weighed exactly the same. The lightweight balls I set aside for use when plinking or to let friends shoot who were interested in shooting a muzzleloader for fun. After I learned to cast my own ball I find fewer inconsistencies in them and those that happen to be too light simply go back into the melting pot.
List of necessary tools
- Reloaders scales
- Micrometer
- Dial calipers
- Adjustable powder measure
- Front and rear rifle rests
- Sand bags
- Metal range rod with muzzle protector
Recipe for moose milk
- Two ounces of Ballistol
- One ounce of Lestoil concentrated liquid detergent
- Sixteen ounces of distilled or filtered water
- Mix well in an empty spray bottle
This makes a very good black powder solvent that will not damage the finish on the rifle stock. It can also be used as a patch lubricant until you reach the point of testing the water-soluble oil lube mixture.