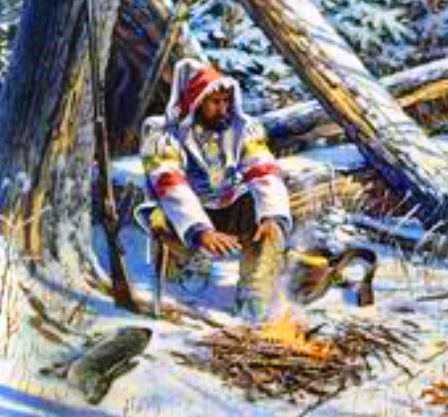
 Fire is essential to outdoor living. For the mountaineer or trapper living in the Rocky Mountain wilderness the ability to quickly start a fire under the most adverse conditions was not just a matter of comfort. It was literally a matter of living or dying from exposure to cold or wet conditions.
The common practice of the mountain man was to start his fires with flint and steel. Fire steels were produced in blacksmith shops and came in various shapes and designs. A very common shape was that of a flat sided “C” which fits over three fingers. These were popular trade items and an essential part of each trappers outfit.
In addition to a fire steel, the trapper carried flints to strike against the steel. The sparks produced would be directed to fall onto a piece of charred linen cloth. When a spark hits a piece of properly charred cloth it creates a tiny red/orange glowing ring that slowly expands throughout the cloth. It is impossible to blow it out. In fact, the more wind that hits it or the harder you blow on it simply makes it grow faster and hotter. The only way to put it out is by suffocation (which preserves the remaining cloth for future use) or dousing it with water. The amazing thing about charred cloth is that in windy weather it is easier to start a fire with flint and steel than it is to use a match!

Three sizes of fire steels. The smaller c shaped steel is shown above a gun flint. The other stones are chert found in Texas. All three stones and steels are reliable fire starters but the larger set is easiest and quickest to use because it produces an abundance of hot sparks.
The earliest historical reference of matches appears in China around 577 AD. These were slivers of pine wood coated with Sulphur and ignited with heat or flame. As advances in development of matches progressed, the first strike by friction matches appeared around 1669. These were of heavy paper or wood, coated with a mixture of white phosphorous and Sulphur. Matches of this type known as Lucifers appear on inventory lists of trade goods from 1829. However, these matches had many short comings and problems. They could ignite spontaneously and rather violently, throwing globs of flaming sparks a considerable distance. They were adversely affected by moisture, the flame produced was rather unsteady, and they gave off very noxious and poisonous fumes. Exposure to the fumes of white phosphorous on matches was the cause of a deforming necrosis of the bones in the face known at the time as “phossy jaw”. The phosphorous from one package of matches was enough poison to commit suicide or murder. Both of which were documented occurrences during the times.
Eventually, a process for refining white phosphorous into a safer form of red phosphorous was discovered and the safety match was developed. Matches using white phosphorous were finally banned in America in 1910. Although matches were available during the rendezvous period, they were unreliable and ineffective for wilderness use in all but ideal conditions.
On a sunny day the mountaineer could start his fire using a magnifying glass to focus the heat from the sun onto some tinder and produce a flame. At the time these were called “burning glasses” and they appear on many inventory lists of trade goods. No doubt, the trappers also knew how to make fire by friction using the fire drill and bow commonly used by the Indian tribes. In a pinch, a mountain man could start a fire using the flintlock of his gun. If the gun were loaded, he would plug the vent and place charred cloth in the pan to catch a spark, or fill the pan with powder and hold a nest of tinder close enough to the pan to catch fire from the flames produced by the burning powder.
It is understandable why the trappers preferred method of starting a fire was with the flint and steel or as the trappers called it the “strike a light”. Of all primitive methods, the use of flint, steel, and charred cloth is the most convenient, reliable, and fastest method for producing a flame. Especially under adverse conditions.
During flint and steel fire starting competitions at modern day rendezvous it is common for most participants to start a fire in thirty seconds or less. The winners of these contests can produce a flame is as few as three to six seconds.
A good flint and steel fire kit consists of five basic items:
1 Flint
2 Fire Steel
3 Charred cloth
4 Tinder
5 Water tight container
Flint, chert, and jasper are all forms of chalcedony. They are all composed of precipitated silicon dioxide. These rocks are hard enough to hold a sharp edge and strong enough to shave away the hardest carbon steel without crumbling. These are the rock from which Stone Age man fashioned his tools and weapons.
Chert is very common throughout the United States while the higher quality black flint is imported from England. It is interesting that trade lists from the fur companies show imported gun flints but not fire starting flints. Perhaps the easier to obtain chert being perfectly adequate for fire starting made it unnecessary to use valuable gun flint for the purpose of fire making?
Fire steels are made from carbon steel and tempered to a hardness of about 5 ½ to 6 ½ on a hardness scale of one to ten. Just because a fire steel is made from quality tool steel or an old file does not mean that it will produce good sparks. The blacksmith who made the fire steel must re-temper its face to the ideal hardness.
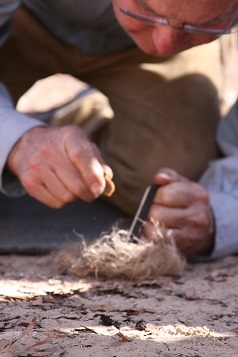
Producing sparks from flint and steel requires some knowledge and mastery of correct technique. Bashing a round piece of chert against steel is not going to produce sparks. The idea is to break the chert (or flint) so that you have a sharp edge. The best way is to use a palm sized flake and keep its edge sharp by using a knapping tool, knapping hammer, or antler. Hold the flint in one hand with the sharp edge angled upwards and strike it with the steel. The idea is to slice off tiny bits of the steel. The trick is not to hit the flint hard, but to hit it fast. Speed makes all the difference. Short hard strokes will chip the flint. Long fast strokes will shave off bits of steel with enough energy to melt those tiny slivers into molten white hot spheres. One good stroke should be all you need to send hot glowing sparks flying through the air. If those sparks sting a little when they land on the back of your hand you are doing it correctly.
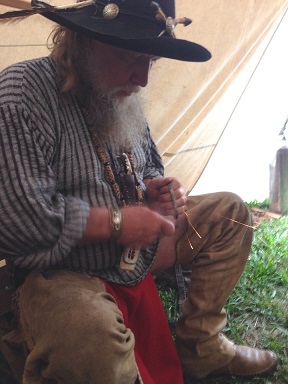
This rendezvous re-enactor is throwing good hot sparks. His fire steel is properly hardened and his flint is sharp. These are the type of sparks you want.
Care should be taken to avoid striking fingers against the sharp edge of the flint. The flat “C” shaped fire steel is a good one for beginners and very correct for the time period of the mountain men. The fire steel should be about half an inch thick and large enough to get three fingers inside the “C”. The steel itself will then protect your knuckles from the flint. Strike the steel on a convex flint edge and never a concave edge to avoid slicing fingers.
It will require a certain amount of practice to become skilled in producing sparks with flint and steel. Practice outdoors, at first you will chip and flake the flint and those flakes are as sharp as shards of glass. When you have your stroke right you won’t chip the flint and good sparks will fly. But you don’t want flint shards or hot sparks landing in the carpet. After you have this technique mastered you may want to try a different shaped or smaller fire steel. Some people prefer to hold the steel stationary and strike it with the sharp edge of the flint and there could be circumstances where this method has its advantages.
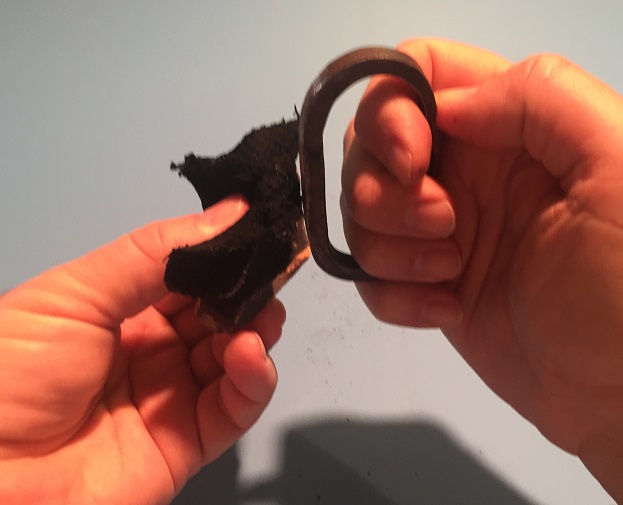
This is the correct way to hold the charred cloth on the flint. It is folded in order to place two or more raw edges close to the sorce of the sparks. Notice that the steel is large enough to enclose three fingers protecting them from the sharp edge of the flint. This illistrates the proper angle to strike steel aginst flint. The goal is to shave off tiny bits of steel.
Many survival and scouting books give instructions on how to start fires with flint and steel. These books suggest that punk wood, dry grass, cottonwood fluff, wood shavings, lint from the clothes dryer, moss and various lichens, will catch fire when exposed to hot sparks. Apparently the authors of those books have done a little research but never actually tried to start a fire with flint and steel themselves. Rendezvous re-enactors experienced in flint and steel fire starting will confirm that none of these materials work. They can be used as tinder and burn quickly when exposed to a flame, but they will not catch and hold a spark.
During the time of the mountaineers home spun linen cloth was more readily available and less expensive than cotton fabric. This was because cotton fabric at the time, was mostly imported from overseas. Linen is made from processed flax fibers and cotton as we all know is made of the processed fibers of the cotton plant. Cloth made from either material is appropriate for clothing of the time period, (if consideration is given to the economic status of the user) either makes good gun patching or wadding, and properly charred, both will catch and hold a spark from the flint and steel. Today, cotton is the less expensive of the two materials and the most commonly used for the previously mentioned purposes.
The most critical aspect of making fire with the flint and steel is the charred cloth. Linen cloth might be the traditional choice but 100 percent cotton works as well. Whichever you decide to use make sure it is 100 percent natural material. Synthetic materials will not char, they melt and leave you with a useless mess. White cotton cloth with an open weave or fuzzy flannel texture such as diaper cloth makes fine char that will catch and hold sparks well. Wash the cloth first to remove any starch or sizing before you char it.
To make char cloth you will need a metal can with an air tight lid. A quart size paint can or cookie tin works well. Place it in the camp fire or on a gas burner and burn off all the oils and paint. This will produce fumes so do it outdoors. Let it cool and brush off any ash. Punch a small hole about one eighth inch in the lid and whittle a stick to plug the hole. Some people like to punch a second hole in the bottom of the can as well.
Cut your cloth into squares two to five inches wide and place half a dozen of these loosely into the can. Let your campfire burn down to good cooking coals and place the can in these. For convenience you can use an outdoor gas burner or camp stove.
As the cloth heats up it will put off gasses which rapidly fill the can and drive out all the air. In the absence of oxygen the cloth will char and not burn to useless ash. These volatile gasses will jet out of the hole or holes you punched into the can. These gasses may catch flame. This is fine, the cloth is cooking properly.
The length of time required to char the cloth will depend on the size of the can, the amount of cloth placed inside it, and the temperature of your fire. A lot of smoke will exit from the holes in the can. This is what you want to watch for. When the smoke ceases or only occasional puffs are coming out of the hole immediately remove the can from the fire and plug the holes. Allow the can and its contents to cool completely. If you open the can too soon air will rush in and your charred cloth will burn to ash.
Properly charred cloth will be uniformly black. If there is still color left the cloth did not cook long enough. If the cloth looks ashy, sooty, or falls apart under its own weight it was cooked too long. Properly charred cloth should take little force to tear apart and shouldn’t leave black marks on your fingers.
If the charred cloth looks right, fold it over and place it on top of your flint with the raw edges right up to the sharp edge of the flint. Hold it in place with your thumb and strike the flint with your steel. Sparks that land on the charred cloth should stick and immediately turn into glowing rings which will expand until the piece of cloth is consumed. If the sparks don’t stick or they go out, the cloth was not cooked long enough. If the cloth falls apart and leaves soot on everything it was most likely cooked too long. It may require some practice and adjustment of cooking time until you get good results. Just keep at it until trial and error results in success.
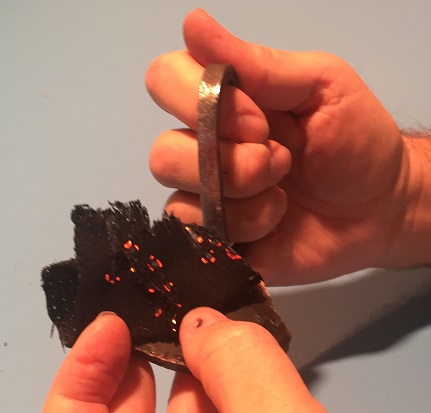
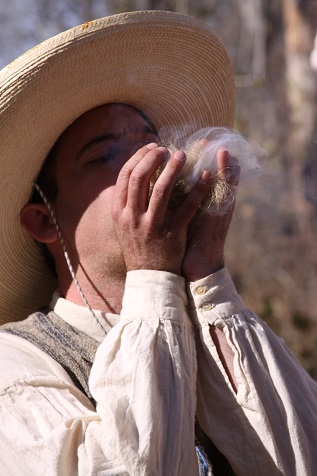
Here is properly chared cloth after one good stroke of steel aginst flint. Each orange spot is where a spark landed and is now burning the cloth. It will not go out until the cloth is consumed. At this point place the glowing char cloth into the nest of tinder and blow on it. The char will burn hotter until the tinder catches fire. There is no need to rush, you can place another piece of charred cloth on this one and the fire will transfer to it.
Once you have good charred cloth that catches and holds sparks you are ready to
produce flame. You will need a nest of fine tinder. (Think of a bird or mouse nest.) Types of materials which make good tinder are; dead dry grass, shredded juniper or cedar bark, sisal rope fibers and flax fibers. (If not treated with fire retardant) Shape your tinder materials into a loosely compressed bowl or nest shape. Strike sparks onto a piece of charred cloth and place it into the center of your nest. Fold the nest around the charred cloth, lift it above your face and blow into it.
When smoke begins to form blow more forcefully until the nest burst into flames.
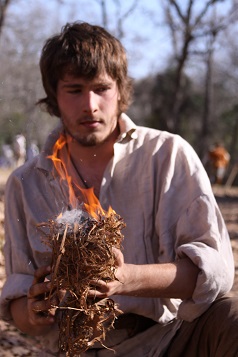
Holding the tinder nest above your face will keep smoke out of your eyes and prevent inhaling it. Hold the nest from the bottom so you don’t scorch your fingers when it bursts into flames and quickly place the burning nest under the kindling of your fire lay. Some people prefer to place the nest of tinder into the fire lay before blowing it into flame. This works if you don’t mind kneeling or lying down in dirt and ash, choking on smoke, or scorching your hair and eyebrows.
Another method for striking sparks is to hold the steel stationary and strike it with the flint. With this method place the charred cloth in the center of the tinder nest, hold the steel above the char and strike it with the flint directing the sparks onto the char.
The final component of any fire starting kit is a water tight container. It is handy to have a container large enough to hold the flint, steel, charred cloth, and tinder materials but all that is really necessary is that it contain the charred cloth and enough tinder to start at least one fire and protect those materials from moisture.
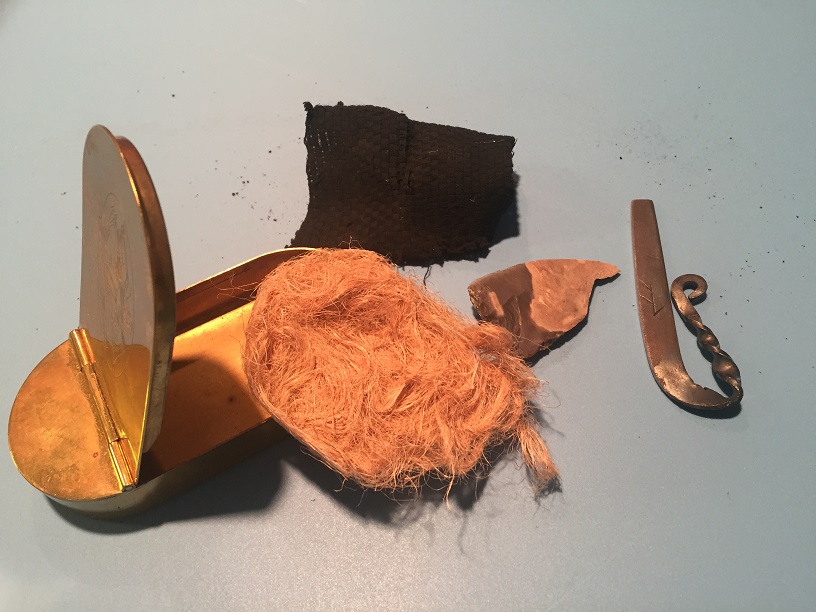
This brass tobaco box has a hinged lid. It contains chert, fire steel, charred cloth and flax fibers for tinder.
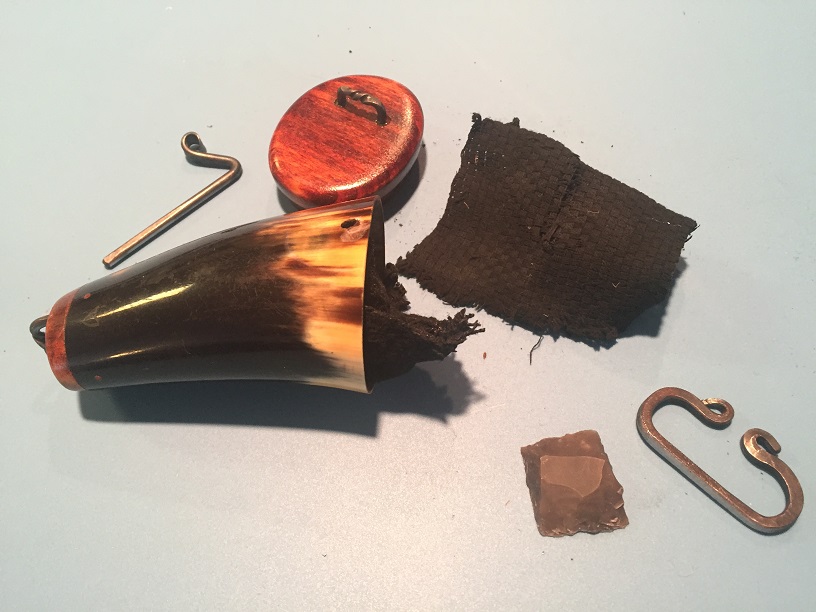
The cow horn container holds tinder, charred cloth, a gun flint, and a very small fire steel. This container is water proof once closed.
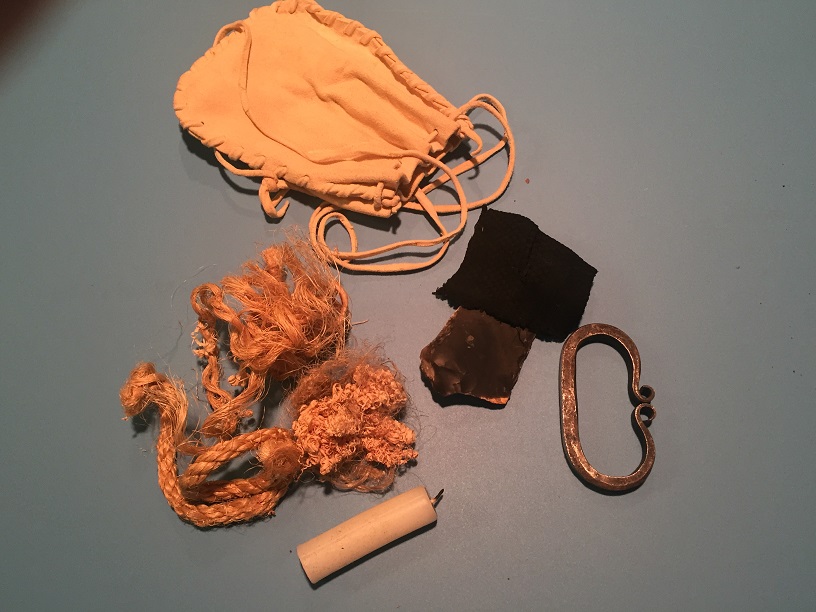
The fire kit pictured here is not water proof but it is carried inside a larger leather shooting bag that is. The tinder pictured is flax fiber, very thin wood shavings and sisal rope. The candle stub can be lit with just a piece of charred cloth.
Written descriptions of many common, every day chores are sorely lacking from historical documentation. It would seem that no one saw any reason to record a description of such routine and common knowledge. While we know that charred cloth was the preferred material for making fire with flint and steel over two hundred years ago, we have little documentation of what was used when a mountaineer ran out of cloth.
Many materials have been suggested, and just about any organic material should work if properly charred. One alternative material which works well, though not as quickly or as reliably as charred cloth, is the charred remains of a previous campfire. Chunks of deeply charred material from a partly burned log can be cut off and stored in a tobacco box with a tight fitting lid. Sparks can then be directed into the box. When one of those pieces catches and holds a spark it can be removed and placed into a nest of tinder and blown on to produce flame. Any charred wood remaining in the box which may have caught sparks will be smothered out when the lid is closed. In this manner a trapper could have maintained a steady supply of charred material to light his fires. However, this author has yet to discover any documentation describing the use of such method.
Hopefully, the information as described, along with some applied practice will enable the reader to reach a point where lighting fires with flint and steel becomes as quick and easy as using a match.